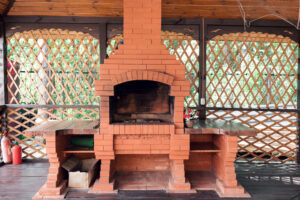
Summer may be over, but grill season never needs to end! By building a brick grill meant to last, you can enjoy delicious food year round.
Traditional grills aren’t able to endure the fall, spring, and winter months. That’s why knowing how to build a brick grill that can last a lifetime is a better long-term investment. Grills made out of metal easily rust, sometimes just after one season of use. With brick grills, you don’t need to worry about rust and potential breakdown of mechanical components.
Brick grills are stable and sturdy. The best part is that they are also customizable! Read on to learn how to build a brick grill that meets your needs and lasts.
How to Build and Brick Grill that Lasts a Lifetime
1. Consider Your Budget
Before you purchase any materials, consult your budget and needs. If you just want to build a brick grill with no additional features (such as cabinet space or a fireplace) then expect to pay less.
Identify the maximum amount you’re willing to pay for the highest quality materials. If you need to save more to purchase products that will last a lifetime, then consider waiting until your budget is healthier.
The key is to purchase quality products so that the brick grill lasts.
2. Gather Materials
Decide on the size of the grill you want by starting with the grill grate’s dimensions. If you only have a small space to work with, then purchase a smaller grill grate. Also, consider how tall you would like the grill to be, as this will influence the number of layers and bricks needed.
Materials needed for this project include fire-safe bricks, regular bricks, and mortar. You may also need to purchase handheld tools such as a level, chisel, jointer, trowel, and a stiff brush.
If you do not currently have a concrete slab to place your brick grill on top of, then you will also need to construct one prior. This will be an additional cost.
3. Dry-Fit Brick Pattern
Using the dimensions of the grill grate, dry-fit the bricks. Lay out where the bricks need to be so that the grill grate can slide in and out. Aim for a snug fit so that the grill grate isn’t loose.
If you intend to use one row of bricks surrounding the grill, opt for fire-safe bricks to ensure longevity and safety.
4. Lay the First Bricks
Mix the mortar according to the instructions outlined. Trowel a generous amount of mortar within the dimensions outlined from your dry-brick pattern. Firmly press the brick into place one-by-one and place mortar in-between each connecting brick.
Remove excess mortar as you work. When finished with the first layer, check that it’s level and squared out.
5. Lay Two More Layers
In a staggering pattern, lay two more layers of brick using the mortar. Press firmly and remove excess mortar.
6. Continue Adding Layers
Continue adding layers horizontally in the staggered pattern until you’ve reached the height of where you would like your grill grate to rest. You can have various grill ledges to account for differing cooking temperatures and heat levels.
To create a ledge, lay at least three bricks perpendicular to the horizontal bricks on the back end of your grill’s structure. Allow these bricks to jut out on the inside of the grill to create a shelf for the grill grate.
This may also cause bricks to jut out the back of your grill. You can cut these bricks or leave them alone depending on your vision and space requirements.
Continue creating additional shelving for every other row. The final layer of bricks should be in a horizontal pattern.
7. Finishing Touches
After you finish the last layer of bricks but before the mortar completely dries, use a brick jointer to smooth out the mortar and create a depression effect. If you would like to add additional rows of brick to the outside of your brick grill structure, then continue to do so after the initial brick structure dries.
Follow the same brick-laying sequence as before, keeping additional connecting bricks in mind.
Ready to Build Your Brick Grill?
We offer high-quality brick pavers for contractors and brick grill do-it-yourselfers in Southeast Wisconsin. Check out our selection or visit our website to watch tutorial and installation videos and feel more confident about your next project.


